
S.M.A.R.T Repair is a malicious software that will display fake alerts, claiming that several hard drive errors were detected on your computer.
In reality, none of the reported issues are real, and are only used to scare you into buying S.M.A.R.T Repair and stealing your personal financial information.This rogue software has changed your desktop background,hidden your files and shortcuts and it’s causing browsing redirects.
Under no circumstance should you buy this rogue security software as this can lead to identity theft. If you’ve got a S.M.A.R.T Repair infection , you’ll be seeing this screens :

Removal guide for S.M.A.R.T Repair
Start your computer in Safe Mode with Networking then log on to your computer with a user account that has administrator rights

Follow the below instructions to remove the proxy. Start Internet Explorer and if you are using Internet Explorer 9, click on the gear icon (Tools for Internet Explorer 8 users), then select Internet Options.

Then go to the tab Connections. At the bottom, click on LAN Settings. Uncheck the option Use a proxy server for your LAN. This should remove the malicious proxy server and allow you to use the internet again.

If you are a Firefox users, go to Firefox(upper left corner) → Options → Advanced tab → Network → Settings → Select No Proxy
STEP 2: Run RKill to terminate known malware processes associated with Smart HDD.
May download from official website, then execute the RKill after download is completed. Be patient while the program is looks for various malware programs and tries to termintate them.

IF you receive a message that RKill is an infection, that is a fake warning given by the rogue. As a possible solution we advise you to leave the warning on the screen and try to rename RKill then run RKill again. Run RKill until the fake program is not visible but not more than ten times.
When Rkill has completed its task, it will generate a log. You can then proceed with the rest of the guide.

WARNING: Do not reboot your computer after running RKill as the malware process will start again, preventing you from properly performing the next step.
STEP 3: Remove Smart HDD malicious files with Malwarebytes Anti-Malware FREE
Please download the latest official version of Malwarebytes Anti-Malware FREE.
When the installation begins, keep following the prompts in order to continue with the installation process. Do not make any changes to default settings and when the program has finished installing, make sure you leave both the Update Malwarebytes’ Anti-Malware and Launch Malwarebytes’ Anti-Malware checked. Then click on the Finish button. If Malwarebytes’ prompts you to reboot, please do not do so. Then start the Malwarebytes’ Anti-Malware FULL scanning.

You will now be presented with a screen showing you the malware infections that Malwarebytes’ Anti-Malware has detected. Please note that the infections found may be different than what is shown in the image. Make sure that everything is Checked (ticked) and click on the Remove Selected button

Malwarebytes’ Anti-Malware will now start removing the malicious files. If during the removal process Malwarebytes will display a message stating that it needs to reboot, please allow this request.

STEP 4: Double check your system for any left over infections with HitmanPro
This step can be performed in Normal Mode ,so please download the latest official version of HitmanPro.
NOTE : If you have problems starting HitmanPro, use the “Force Breach” mode. Hold down the left CTRL-key when you start HitmanPro and all non-essential processes are terminated, including the malware process.

After finish installation, just perform scanning once. Once the scan is complete,a screen displaying all the malicious files that the program found will be shown as seen in the image below. After reviewing each malicious object click Next.

Click Activate free license to start the free 30 days trial and remove the malicious files.

HitmanPro will now start removing the infected objects, and in some instances, may suggest a reboot in order to completely remove the malware from your system. In this scenario, always confirm the reboot action to be on the safe side.
STEP 5: Unhide your files and folders
Smart HDD modifies your file system in such a way that all files and folders become hidden, to restore the default settings , you’ll need to run the below program.
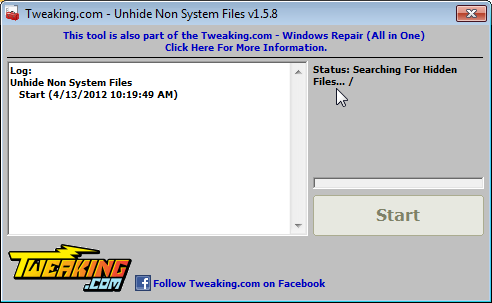
Please download Tweaking.com-UnhideNonSystemFiles.exe to unhide your files and folders.
Double click on Tweaking.com-UnhideNonSystemFiles.exe and when the utility starts click on the ‘Start’ button to unhide your files.
STEP 6: Restore your shortcuts and remove any left over malicious registry keys
Smart HDD has moved your shortcuts files in the Temporary Internet folder and added some malicious registry keys to your Windows installation , to restore your files we will need to perform a scan with RogueKiller. Please download the latest official version of RogueKiller.
Double click on RogueKiller.exe to start this utility and then wait for the Prescan to complete.This should take only a few seconds and then you canclick the Start button to perform a system scan.

After the scan has completed, press the Delete button to remove any malicious registry keys.
Next we will need to restore your shortcuts, so click on the ShortcutsFix button and allow the program to run.
STEP 7: Get your desktop look back!
Smart HDD changes your desktop background to a solid black color,to change it back to default one follow the below instruction.
- Windows XP: Click on the Start button and then select Control Panel. When the Control Panel opens, please click on the Display icon. From this screen you can now change your Theme and desktop background.
- Windows 7 and Vista: Click on the Start button and then select Control Panel. When the Control Panel opens, please click on the Appearance and Personalization category. Then select Change the Theme or Change Desktop Background to revert back to your original Theme and colors.
STEP 8: Restore your pinned task bar shortcuts , star menu items and other missing icons.
Smart HDD has moved your saved pinned task bar items and other shortcuts into the temporary internet folder, so now we will have to copy them back to their original location.
Enable on your system the ‘Show hidden files, folders, and drives’ option.
- If you are using Windows 7 or Vista,go to Computer → Click on theOrganize tab → select Folder and search options.
- If you are using Windows XP,go to My Computer → Tools tab → selectFolder Options.

In the new window that appeared select the View tab and choose the option Show hidden files, folders, and drives then click Apply and OK.
This rogue software has moved your shorcuts in a folder in the Temporary Internet files called smtmp, so now we will need to copy them back to their original locations.
- Windows 7 and Vista users can find the smtmp folder in C:\Users\[Your Username]\AppData\Local\Temp
- Windows XP users can find smtmp folder the in : C:\DOCUMENTS AND SETTINGS\[Your Username]\LOCAL SETTINGS\Temp

The smtmp folder will contain 4 folders and you’ll need to copy the content of this folders back to their original locations.
Copy the content from %Temp%\smtmp\1\ to:
- Windows XP: C:\Documents and Settings\All Users\Start Menu
- Windows Vista and Windows 7: C:\ProgramData\Microsoft\Windows\Start Menu
- Copy the content from %Temp%\smtmp\2\ to:
- Windows XP: C:\Documents and Settings\[your username]\Application Data\Microsoft\Internet Explorer\Quick Launch\
- Windows Vista and Windows 7: C:\Users\[your username]\AppData\Roaming\Microsoft\Internet Explorer\Quick Launch\
- Copy the content from %Temp%\smtmp\3\ to:
- Windows XP: It does not exist on Windows XP.
- Windows Vista and Windows 7 C:\Users\[your username]\AppData\Roaming\Microsoft\Internet Explorer\Quick Launch\User Pinned\TaskBar
- Copy the content from %Temp%\smtmp\4\ to:
- Windows XP : C:\Documents and Settings\All Users\Desktop
- Windows Vista and Windows 7: C:\Users\Public\Desktop
End of Topic.
Good Luck to you all... ^-^
Reference:
http://malwaretips.com/blogs/s-m-a-r-t-repair-rogue-removal-instructions/
http://www.malwareexperts.com/s-m-a-r-t-repair-removal-guide/
http://www.spywarehelpcenter.com/smart-repair-virus-removal-instructions/
http://www.google.com.sg/search?sourceid=chrome&ie=UTF-8&q=smart+repair+removal


