Showing posts with label WinVIsta. Show all posts

Wednesday, October 3, 2012

[Fix] S.M.A.R.T Repair Removal Instructions


S.M.A.R.T Repair is a malicious software that will display fake alerts, claiming that several hard drive errors were detected on your computer.

In reality, none of the reported issues are real, and are only used to scare you into buying S.M.A.R.T Repair and stealing your personal financial information.This rogue software has changed your desktop background,hidden your files and shortcuts and it’s causing browsing redirects.


Under no circumstance should you buy this rogue security software as this can lead to identity theft. If you’ve got a S.M.A.R.T Repair infection , you’ll be seeing this screens :

Removal guide for S.M.A.R.T Repair
Start your computer in Safe Mode with Networking then log on to your computer with a user account that has administrator rights

STEP 1: Remove Smart HDD malicious proxy server Smart HDD may add a proxy server which prevents the user from accessing the internet
Follow the below instructions to remove the proxy. Start Internet Explorer and if you are using Internet Explorer 9, click on the gear icon (Tools for Internet Explorer 8 users), then select Internet Options.

Then go to the tab Connections. At the bottom, click on LAN Settings. Uncheck the option Use a proxy server for your LAN. This should remove the malicious proxy server and allow you to use the internet again.

If you are a Firefox users, go to Firefox(upper left corner) → Options → Advanced tab → Network → Settings → Select No Proxy


STEP 2: Run RKill to terminate known malware processes associated with Smart HDD.
May download from official website, then execute the RKill after download is completed. Be patient while the program is looks for various malware programs and tries to termintate them.


IF you receive a message that RKill is an infection, that is a fake warning given by the rogue. As a possible solution we advise you to leave the warning on the screen and try to rename RKill then run RKill again. Run RKill until the fake program is not visible but not more than ten times.

When Rkill has completed its task, it will generate a log. You can then proceed with the rest of the guide.


WARNING: Do not reboot your computer after running RKill as the malware process will start again, preventing you from properly performing the next step.

STEP 3: Remove Smart HDD malicious files with Malwarebytes Anti-Malware FREE
Please download the latest official version of Malwarebytes Anti-Malware FREE.


When the installation begins, keep following the prompts in order to continue with the installation process. Do not make any changes to default settings and when the program has finished installing, make sure you leave both the Update Malwarebytes’ Anti-Malware and Launch Malwarebytes’ Anti-Malware checked. Then click on the Finish button. If Malwarebytes’ prompts you to reboot, please do not do so. Then start the Malwarebytes’ Anti-Malware FULL scanning.

You will now be presented with a screen showing you the malware infections that Malwarebytes’ Anti-Malware has detected. Please note that the infections found may be different than what is shown in the image. Make sure that everything is Checked (ticked) and click on the Remove Selected button

Malwarebytes’ Anti-Malware will now start removing the malicious files. If during the removal process Malwarebytes will display a message stating that it needs to reboot, please allow this request.


STEP 4: Double check your system for any left over infections with HitmanPro
This step can be performed in Normal Mode ,so please download the latest official version of HitmanPro.


NOTE : If you have problems starting HitmanPro, use the “Force Breach” mode. Hold down the left CTRL-key when you start HitmanPro and all non-essential processes are terminated, including the malware process.

After finish installation, just perform scanning once. Once the scan is complete,a screen displaying all the malicious files that the program found will be shown as seen in the image below. After reviewing each malicious object click Next.

Click Activate free license to start the free 30 days trial and remove the malicious files.

HitmanPro will now start removing the infected objects, and in some instances, may suggest a reboot in order to completely remove the malware from your system. In this scenario, always confirm the reboot action to be on the safe side.


STEP 5: Unhide your files and folders
Smart HDD modifies your file system in such a way that all files and folders become hidden, to restore the default settings , you’ll need to run the below program.

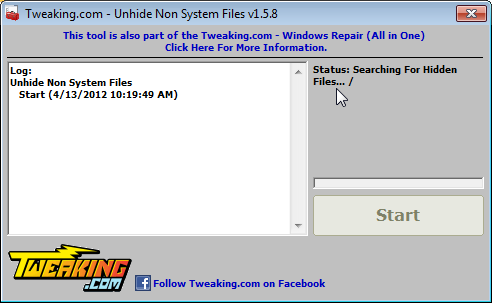
Please download Tweaking.com-UnhideNonSystemFiles.exe to unhide your files and folders.

Double click on Tweaking.com-UnhideNonSystemFiles.exe and when the utility starts click on the ‘Start’ button to unhide your files.

STEP 6: Restore your shortcuts and remove any left over malicious registry keys
Smart HDD has moved your shortcuts files in the Temporary Internet folder and added some malicious registry keys to your Windows installation , to restore your files we will need to perform a scan with RogueKiller. Please download the latest official version of RogueKiller.

Double click on RogueKiller.exe to start this utility and then wait for the Prescan to complete.This should take only a few seconds and then you canclick the Start button to perform a system scan.


After the scan has completed, press the Delete button to remove any malicious registry keys.
Next we will need to restore your shortcuts, so click on the ShortcutsFix button and allow the program to run.

STEP 7: Get your desktop look back!
Smart HDD changes your desktop background to a solid black color,to change it back to default one follow the below instruction.
  • Windows XP: Click on the Start button and then select Control Panel. When the Control Panel opens, please click on the Display icon. From this screen you can now change your Theme and desktop background.
  • Windows 7 and Vista: Click on the Start button and then select Control Panel. When the Control Panel opens, please click on the Appearance and Personalization category. Then select Change the Theme or Change Desktop Background to revert back to your original Theme and colors.
STEP 8: Restore your pinned task bar shortcuts , star menu items and other missing icons.
Smart HDD has moved your saved pinned task bar items and other shortcuts into the temporary internet folder, so now we will have to copy them back to their original location.

Enable on your system the ‘Show hidden files, folders, and drives’ option.
  • If you are using Windows 7 or Vista,go to Computer → Click on theOrganize tab → select Folder and search options.
  • If you are using Windows XP,go to My Computer → Tools tab → selectFolder Options.

In the new window that appeared select the View tab and choose the option Show hidden files, folders, and drives then click Apply and OK.

This rogue software has moved your shorcuts in a folder in the Temporary Internet files called smtmp, so now we will need to copy them back to their original locations.
  • Windows 7 and Vista users can find the smtmp folder in C:\Users\[Your Username]\AppData\Local\Temp
  • Windows XP users can find smtmp folder the in : C:\DOCUMENTS AND SETTINGS\[Your Username]\LOCAL SETTINGS\Temp

The smtmp folder will contain 4 folders and you’ll need to copy the content of this folders back to their original locations.
Copy the content from %Temp%\smtmp\1\ to:
  • Windows XP: C:\Documents and Settings\All Users\Start Menu
  • Windows Vista and Windows 7: C:\ProgramData\Microsoft\Windows\Start Menu
  • Copy the content from %Temp%\smtmp\2\ to:
  • Windows XP: C:\Documents and Settings\[your username]\Application Data\Microsoft\Internet Explorer\Quick Launch\
  • Windows Vista and Windows 7: C:\Users\[your username]\AppData\Roaming\Microsoft\Internet Explorer\Quick Launch\
  • Copy the content from %Temp%\smtmp\3\ to:
  • Windows XP: It does not exist on Windows  XP.
  • Windows Vista and Windows 7 C:\Users\[your username]\AppData\Roaming\Microsoft\Internet Explorer\Quick Launch\User Pinned\TaskBar
  • Copy the content from %Temp%\smtmp\4\ to:
  • Windows XP : C:\Documents and Settings\All Users\Desktop
  • Windows Vista and Windows 7: C:\Users\Public\Desktop

End of Topic.
Good Luck to you all... ^-^


Reference:
http://malwaretips.com/blogs/s-m-a-r-t-repair-rogue-removal-instructions/
http://www.malwareexperts.com/s-m-a-r-t-repair-removal-guide/
http://www.spywarehelpcenter.com/smart-repair-virus-removal-instructions/
http://www.google.com.sg/search?sourceid=chrome&ie=UTF-8&q=smart+repair+removal


Saturday, September 29, 2012

How to Add / Remove Items from “New” in Windows Context Menu?

In Windows, whenever we right-click on Desktop, we get "New" menu which contains shortcuts for various known file types. We can easily create new files using this handy "New" menu.


Sometimes we may want to remove a few unwanted items from "New" menu or we may want to add a few necessary items to "New" menu which are not present.

So in this tutorial, you will learn how to add / remove items to / from "New" menu by editing registry file.

To Add an Item in "New" menu:
1. Type regedit in RUN dialog box and press Enter.
2. Now expand "HKEY_CLASSES_ROOT" key.
3. Then, look for the file type which you want to add in "New" menu
e.g. for adding MP3 file type look for .MP3 key.
3. Right-click on it and select "New -> Key" and give it name "ShellNew".


4. In right-side pane, right-click and select "New -> String Value". Give it name "NullFile" and press Enter.


5. Thats it. You have added into "New" Context Menu.

You'll immediately get the file type entry in "New" menu. Otherwise, you may just hit "F5" button to refresh your desktop, then you will see the new entry in "New" menu.

Next, to remove it which similar with add method.

To Remove an Item from "New" menu:
1. Type regedit in RUN dialog box and press Enter.
2. Now expand "HKEY_CLASSES_ROOT" key.
3. Then, look for the file type which you want to remove from "New" menu
e.g. for removing MP3 file type look for .MP3 key.
4. Expand it and delete the "ShellNew" key.
5. That's it. The file type will be removed from "New" menu.


Reference: http://www.askvg.com/how-to-add-remove-items-from-new-menu-in-windows/


Sunday, September 2, 2012

HyperTerminal in Windows 7 (32 or 64-bit)


Frustrated on looking for HyperTerminal in Window 7?
Ya, this is one of the big complaints about Windows 7.
So here is how to get HyperTerminal on to Windows 7 (32 or 64-bit).


On the Windows 7, make a new folder named as "Hyper Terminal" under C:\Program Files or C:\Program Files (x86)
From a Windows XP, copy the following files to the folder that was just created on the Windows 7:
C:\Program Files\Windows NT\hypertrm.exe
C:\WINODWS\system32\hypertrm.dll
C:\Windows\System32\hticons.dll
C:\Program Files\Windows NT\htrn_jis.dll
C:\WINODWS\Help\hypertrm.chm
C:\WINDOWS\Help\hypertrm.hlp


Now just run hypertrm.exe and HyperTerminal is on Windows 7.

If you want to have HyperTerminal on your Start Menu just create a shortcut to hypertrm.exe and put it in C:\ProgramData\Microsoft\Windows\Start Menu\Programs and when you go to All Programs under the Start Menu, HyperTerminal will be there.

If you didn't copy C:\Windows\System32\hticons.dll into the particular folder, there will be no icons shown when creating a connection. However that is a non issue.


A quick side note if you have problems getting your USB to Serial connection working under Windows 7 try getting drivers from http://www.prolific.com.tw/eng/downloads.asp?ID=31.The PL2303_Prolific_DriverInstaller_v10518.zip worked great for me.


You can download the files you need from this link:
HyperTerminal.rar which are contain all the files.
If you want download separate file, may choose from Separate File

NOTE: These 2 DLLs should be included for full functionality, that most of the sites with articles about this neglect to mention.
C:\Program Files\Windows NT\htrn_jis.dll
C:\Windows\System32\hticons.dll
And if you want the help files, they are:
C:\WINDOWS\Help\hypertrm.chm
C:\WINDOWS\Help\hypertrm.hlp
Hope this helps...

You can also download PuTTY and use that as a replacement to HyperTerminal and has better tools built in.
http://www.chiark.greenend.org.uk/~sgtatham/putty/download.html


Friday, August 10, 2012

[Solved] SearchFilterHost.exe - Application Error


What if you saw on these error message...
 
SearchFilterHost.exe – Application Error The instruction at “0x7c9109fb” referenced memory at “0x00000004″. The memory could not be “read”.
Click on OK to terminate the program.

SearchFilterHost.exe – Application Error The instruction at “0x070609c” referenced memory at “0x00000014″. The memory could not be “read”.
Click on OK to terminate the program.

Microsoft visual c++ runtime library” Runtime Error! Program: C:\WINDOWS\system32\SearchFilterHost.exe. This application has requested the Runtime to terminate it in an unusual way. Please contact the application’s support for more information.

Example with photo:

Here is the solution:

Method 1: Enable Windows Auto Updates.
To enable Windows Auto Updates can help you efficiently repair searchfilterhost.exe error through updating the problematic searchfilterhost.exe file:
1) Click Start, go to Control Panel.
2) Enable the Windows Update utility.
3) Follow the instruction to install AxtiveX and click “Install” to install Windows Update utility.
4) Install all of the updates.
5) Restart PC to confirm the modification.

Method 2: Restore searchfilterhost.exe file from Windows Installation CD.
Due to the fact that searchfilterhost.exe file is a crucial system process that can be installed automatically when the system is installed on the PC, you may consider restoring it from Windows Installation CD once you have found any problems occur to it.
1). Insert the Windows installation CD.
2). Click Start, and then got to Run
3). Type expand cd Drive: \i386\searchfilterhost.exe_c:\windows\system32\searchfilterhost.exe
4). Press the “Enter” button.
5). Restart your computer to confirm this modification.

Method 3: Wipe out damaged Windows Update Files.
1). Click Start, and then go to Run. Once the command prompt windows pops up, type “net stop WuAuServ” onto it and press Enter button.
2). Type “cd %windir%” onto the command prompt window, and press Enter button.
3). From the latest popped- up folder, type ”ren SoftwareDistribution SD_BACKUP”, and press Enter to rename the SoftwareDistribution Folder.
4). Type “net start WuAuServ” onto the command prompt to restart the Windows Update Service.
5). Exit the command prompt.

Method 4: Re- register associated .dll files of searchfilterhost.exe.
In order to fix searchfilterhost.exe error, you may consider trying to re- registering the associated .dll files of searchfilterhost.exe if they haven’t been damaged by any undesirable activity or compromised by malware. You can follow the easy instructions to re- register Wdsshell.dll.dll:
For Windows XP user:
1) Click Start, and then click Run.
2) Type cmd onto the latest dialog box and press Enter button to enable Command Prompt utility.
3) Type regsvr32 wdsshell.dll
or
regsvr32 C:\WINDOWS\system32\wdsshell.dll onto the Command Prompt window as soon as it pops up.
4) Press Enter to confirm the modification.

For Windows 7 user:
1) Click Windows or Start if you are using Classic theme.
2) Type cmd onto the latest search box above Windows menu.
3) As soon as the Command Prompt appears on the screen, type regsvr32 wdsshell.dll

or
regsvr32 C:\WINDOWS\system32\wdsshell.dll
4) Press Enter.

Method 5: Replace it with a compatible one from cyber space.
1) Download the compatible version of searchfilterhost.exe from network.
2) Save it onto a hard disk. And then go to the folder C:\WINDOWS\system32.
3) Locate the problematic version of searchfilterhost.exe on your computer.
4) Rename the current version of searchfilterhost.exe with a name you like.
5) Copy & paste the compatible version into the folder C:\WINDOWS\system32.
6) Click Start and then head to Run.
7) Type cmd onto the latest pop- up and press Enter button to go into the Command mode. (In Windows 7, type cmd onto the latest search box above Windows menu.)
8) Type “regsvr32 searchfilterhost.exe” onto Command Prompt and then press “Enter” button.

Method 6: the last and the most useful method
What if you really no need the latest window search update, can just uninstall the latest version on it.
and It will solve your problem =)
Uninstall from the Programs.

All the best to you ^-^

Reference:
http://www.pcerrorfixtip.com/fix-searchfilterhost-exe-error-how-to-repair-searchfilterhost-exe-error-effectively/
http://www.bleepingcomputer.com/forums/topic405287.html

Monday, July 30, 2012

Solved: missing or corrupted of Windows\System32\Config

If you get the error as below:

Step:
1) Insert the Windows XP bootable CD into the computer. When prompted to press any key to boot from the CD, press any key.
2) Once in the Windows XP setup menu press the "R" key to repair Windows.
3) Log into your Windows installation by pressing the "1" key and pressing enter.
4) You will then be prompted for your administrator password, enter that password. Or else may just leave blank.
5) Go to this directory: 


6) Be safe, we change the file extension of original system file, before we fix the error


7) In the below example we are copying these files from the \windows\repair\ directory, as below:


8) Once both of these files have been successfully copied, remove the CD from the computer and reboot.
9) Restart the computer, Problem is solved.

What if you have other system file corrupted,
you may also follow this steps to fix your problem.

Example:
software system file :-

sam system file :-

security system file :-

default system file :-


Good Luck to everyone. ^-^


Tuesday, July 17, 2012

[How] combine several parts of a file

When you have a lot of separate file parts, how you gonna combine all these file parts into one? 
Let's check out of this snapshot.


Why to create a new folder for those file parts?
Answer: To make clear view for ourselves, and won't mess up the whole progress.

The steps to combine all the file parts are very easy,
We only need to use "copy /b" command to combine all the file as the snapshot shown.

No matter what time of file extension, even movie, music files, you able to use this command to combine all your file parts rather then use other softwares.


Tuesday, May 22, 2012

[FIX] BOOTMGR is missing!!

You may get this error while booting your computer, when this error message shown is indicate that the boot sector is damaged or missing.

In this cases, you may need a Window installation disk as we need to boot into Window Recovery Environment (WinRE).


Method 1: Startup Repair from the Windows Recovery Environment (WinRE)
====================================================
1. Insert the Windows Vista installation disc into the disc drive, and then start the computer.
2. Press a key when the message indicating "Press any key to boot from CD or DVD …". appears.
3. Select a language, a time and currency, and a keyboard or input method, and then click Next.
4. Click Repair your computer.
5. In the System Recovery Options dialog box, choose the drive of your Windows installation and click Next.
6. At the System Recovery Options Dialog Box, click on Repair your computer.
7. Click the operating system that you want to repair, and then click Next.
8. In the System Recovery Options dialog box, click Startup Repair.


Method 2: Fix or Rebuild BCD
=====================
1. Put the Windows Vista installation disc in the disc drive, and then start the computer.
2. Press a key when the message indicating "Press any key to boot from CD or DVD …". appears.
3. Select a language, a time, a currency, and a keyboard or another input method, and then click Next.
4. Click Repair your computer.
5. Click the operating system that you want to repair, and then click Next.
6. In the System Recovery Options dialog box, click Command Prompt.
7. Type bootrec /fixboot, and the press ENTER
8. Reboot machine, check whether it is successful to boot into Window.

What if doesn't work, please follow the steps below to recreate BOOTMGR system file.

1. Follow method 2, until Step7
2. Type command as below
 
3. After finish all this command, may close the command prompt and reboot your machine.


Related Posts Plugin for WordPress, Blogger...