Tuesday, April 24, 2012

[How] Open an image by using default window programs

What if we don't want open any image file by using another or alternate or third party software, How do we set to open a image by using default window setting, such as Window Photo Viewer in Window 7.
Just as window default programs.


Now, here is the step, to teach you how to configure in registry way... =)

1.       Run -> cmd -> regedit
2.       HKEY_CLASSES_ROOT -> Directory -> Shell


3.       Double click on “Default” or right click on it choose Modify


4.       Type in none in “Value data” field.


Monday, April 23, 2012

How to re-create the Show desktop icon on the Quick Launch toolbar

To re-create the Show desktop icon by yourself, you may follow these method:


Method 1: Manually re-create the Show Desktop Icon
  1. Click Start, click Run, type notepad in the Open box, and then click OK.
  2. Carefully copy and then paste the following text into the Notepad window: 
  3. On the File menu, click Save As, and then save the file to your desktop as "Show desktop.scf" (with quotes, in order to prevent Notepad from appending .txt extension) The Show desktop icon is created on your desktop.
  4. Click and then drag the Show desktop icon to your Quick Launch toolbar.


Method 2: Using the Regsvr32 command
  1. Click Start, Run and type the following command:
  2. The Show Desktop icon file should be available now.


Method 3: Copy the file from another user account

Every user account will have a copy of Show Desktop.scf file. Search for the file named Show Desktop.scf in your computer by logging in as administrator. Copy it to your user profile path here:

(Type the above path in Start, Run dialog)


Sunday, April 22, 2012

[How] Open folder in same window / separate window

1)      Configure in folder setting
1.       Click on folder options


2.       Select the option in “Browse folders” panel


3.       Done

2)      Change registry value
a.       Open folder in same window /separate window
1.       Run -> cmd -> regedit
2.       HKEY_CURRENT_USER -> Software -> Microsoft -> Windows -> Current Version -> Explorer -> CabinetState


3.       Double click “Settings” registry file or right click on in to choose Modify
4.       Change the 5th  value data


Note: 0A – open folder in same window
          2A – open folder in separate window


Saturday, April 21, 2012

Change MS Office product key by Registry file

Step:
1) Run -> cmd -> regedit
2) HKEY_LOCAL_MACHINE -> Software -> Microsoft -> Office


3) Select the office version that installed in your machine
a. 11.0 – MS office 2003
b. 12.0 – MS office 2007
c. 14.0 – MS office 2010

Then go to Registration folder, go in the child folder


4) Just go ahead delete DigitalProductID and ProductID
5) Next, open MS office to re-enter the product key.


Friday, April 20, 2012

[Solved] one or more activex controls could not be displayed


Problem is shown as below


Step:
1) Go to HKEY_CURRENT_USER\Software\Microsoft\Windows\CurrentVersion\Internet Settings\Zones\
2) Then u will see some folder under Zones


3) In Zones folder, you may see other folder name with pseudo-graphic number “L” that is out of numeric order.
4) You can just delete the file that is before zone number 0
5) Problem is solved.

**NOTE: Play safe, please backup your registry file before you make any action.

Reference Link:
1) http://social.technet.microsoft.com/Forums/en/w7itprosecurity/thread/90c3202c-448b-42b7-acf7-dab8dba7b000
2) http://blogs.technet.com/b/asiasupp/archive/2011/01/27/quot-one-or-more-activex-controls-could-not-be-displayed-quot-error-when-you-open-mmc-extended-tab.aspx


Thursday, April 19, 2012

[Solved] NTLDR is missing


Step:
1) Insert the Windows XP bootable CD into the computer. When prompted to press any key to boot from the CD, press any key.
2) Once in the Windows XP setup menu press the "R" key to repair Windows.
3) Log into your Windows installation by pressing the "1" key and pressing enter.
4) You will then be prompted for your administrator password, enter that password. Or else may just leave blank.
5) Copy the below two files to the root directory of the primary hard disk.
  • In the below example we are copying these files from the CD-ROM drive letter, which in this case is "e." This letter may be different on your computer.
6) Once both of these files have been successfully copied, remove the CD from the computer and reboot.
7) Restart the computer.


Wednesday, April 18, 2012

Easy steps to create EDM

What is EDM?
EDM (Electronic Direct Marketing), most of the time refer as email marketing, html emails or newsletters. They are used to announce new products release, promotion or important announcement to consumers.

Well, we are not discussing about what is EDM. Now, let's begin our most simplest test to create EDM.

And also let you see that how easy it is to create EDM.

If you are good in Microsoft Outlook, the guides below explained on inserting a picture to your email content rather than attaching a image file.

Step #0: Keep the JPEG image file ready that needs to be sent via EDM

Example Picture: Good thins come in small packages

Step #1: Open MS Outlook and click "New email" to create a new email
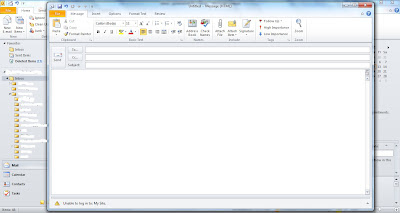
Create a new email


Step #2 : Click Insert and move you ‘cursor’ to the main body of the mail. When you click so the insert tab becomes active.
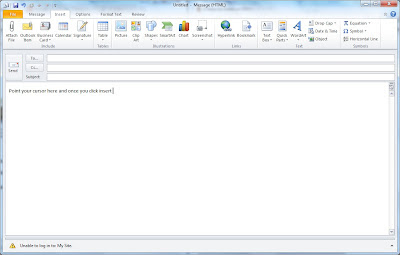
Point the cursor in correct location and select Insert Tab

Insert a picture in email content


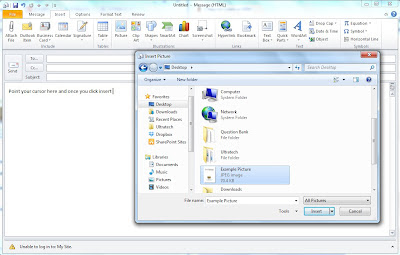
Step #3: Click the ‘picture’ in the Insert Tab and insert the picture.
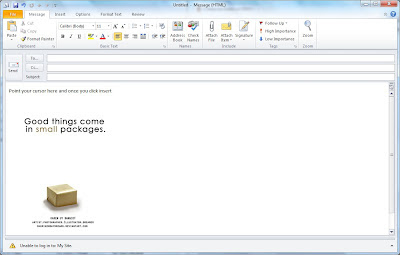
Complete insert image.


Step #4: Send it to your recipient once done with content editing.


Enjoy with IT Weirdo... =)


Tuesday, April 17, 2012

Solution: Windows\System32\Hal.dll is missing


Symptoms:
You will get the following error messages when attempting to boot into window xp
- Invalid boot.ini
- Window could not start because the following file is missing or corrupt: Windows\System32\Hal.dll

Solution:- To correct the Boot.ini file entries
1. Insert Window XP cd and start your computer and press any key when you see the message – “Press any key to boot from CD”
2. After the setup files are finished loaded, press R to repair using Recovery Console.
3. When in the recovery console, select the installation to log on to (usually number 1), and press enter
4. Enter administrator password, leave blank if there is no password
5. Type bootcfg /rebuild, and press enter
6. When the Windows installation is located, the following instructions are displayed:


7. Now you may restart your computer and load into OS.


Reference:
http://support.microsoft.com/kb/314477
http://www.proposedsolution.com/solutions/error-invalid-boot-ini-or-missing-windowssystem32hal-dll/


Monday, April 16, 2012

PDF doesn't print | Adobe Reader | Windows

Facing printing issue when you want to print any file from Adobe Reader?
the printer pop out screen never come out when you click on print icon?

let's following the solution below to solve your problem.

-----------------------------------------------------------------------------------------------------------


Install patch for Reader 10.1.2 (Windows only)

  1. Log in to your Windows computer as an Administrator.
  2. Click the following link to download the patch file: AdobeReaderPatch10.1.2_cpsid_92870.zip.
  3. When prompted "Do you want to open or save this file?", click Open.
  4. Extract the file (also know as unzipping). The option location varies depending on your operating system and the utility.  
  5. Double-click the AdobeReaderPatch10.1.2_cpsid_92870.exe file to begin the update.
  6. When a prompt notifies you that the update is complete, restart your computer.

** If you want to install in silent mode, may follow steps in below

  1. Open the command prompt "As Administrator."
  2. Type the path to the patch file executable, and add the -silent flag on the command line.  For example: 
  3. Silent mode suppresses all dialog boxes so you do not get a message indicating that the update is complete. The executable posts a log file "AcroPatchApplication1012.log" in the temp directory (%temp%).
  4. When the update is complete, restart the computer.


Sunday, April 15, 2012

How to extract .msi file

The .msi installer will temporarily extract the files into C:\Documents and Settings\<username>\Local Settings\Temp, but those files are removed once the installer exits.

Step:
1. Start command prompt (Run as Administrator)
2. Type   msiexec /a filepath to MSI file /qb TARGETDIR=filepath to target folder
      
              Example:
               
3. Done
4. Then you will see a directory is created in C:\temp\test and file will be extracted in this directory.


Reference:
http://www.tech-recipes.com/rx/2557/vista_how_to_extract_content_from_msi_files/
http://thebackroomtech.com/2007/08/23/howto-extract-files-from-a-msi-file-using-the-windows-command-line/


Saturday, April 14, 2012

Clean AutoComplete (NK2) in Outlook 2010


For Outlook 2003, 2007
You able to found NK2 file in

WinXP: C:\Documents and Settings\<user>\Application data\Microsoft\Outlook
Win7: C:\<user>\AppData\Roaming\Microsoft\Outlook

For Outlook 2010....

There is no more NK2 file.
The actual file you are looking for is located is:


C:\Users\%username%\AppData\Local\Microsoft\Outlook\RoamCache\Stream_Autocomplete*.dat.


Deleting this file will not clear your AutoComplete list. 

Use one of the methods listed below to reset the Outlook nickname cache for Microsoft Outlook 2010.

Method 1

  1. With Outlook 2010 open, click File (BackStage), and then click Options.
  2. Click the Mail tab.
  3. Under Send Messages, click Empty Auto-Complete List.
Outlook will generate a new nickname cache.

Method 2

  1. Click Start, and then click Run.
  2. Start Outlook by using the /CleanAutoCompleteCache switch.
    For example: Outlook.exe /CleanAutoCompleteCache
    Note If Outlook is not installed in the default location, you will need to point to the path of Outlook.exe.

Found it at this place http://aspoc.net/archives/2010/05/04/how-to-clear-the-autocomplete-list-in-outlook-2010/


Friday, April 13, 2012

Solution: WinXP cannot boot up without any error message


Firstly:
Go to Window Recovery Console

Then select the Windows:

Usually type 1, and key in the administrator password or just leave blank.

Issue: Fix a corrupt Boot.ini
As the Windows XP operating system begins to load, the Ntldrprogram refers to the Boot.ini file to determine where the operating systemfiles reside and which options to enable as the operating system continues toload. So if there's a problem rooted in the Boot.ini file, it can render WindowsXP incapable of booting correctly.

If you suspect that Windows XP won't boot because Boot.inihas been corrupted, you can use the special Recovery Console version of theBootcfg tool to fix it. Of course, you must first boot the system with theWindows XP CD and access the Recovery Console as described in #4.

To use the Bootcfg tool, from the Recovery Console commandprompt, type
Bootcfg /parameter
Where /parameter is one of these required parameters:
  • /Add--Scans the disk for all Windowsinstallations and allows you to add any new ones to the Boot.ini file.
  • /Scan--Scans the disk for all Windowsinstallations.
  • /List--Lists each entry in the Boot.ini file.
  • /Default--Sets the default operating system as themain boot entry.
  • /Rebuild--Completely re-creates the Boot.inifile. The user must confirm each step.
  • /Redirect--Allows the boot operation to beredirected to a specific port when using the Headless Administration feature.The Redirect parameter takes two parameters of its own, [Port Baudrate ] | [UseBiosSettings].
  • /Disableredirect--Disables the redirection.
Issue: Fix a corrupt partition boot sector
The partition boot sector is a small section of the harddisk partition that contains information about the operating system's filesystem (NTFS or FAT32), as well as a very small machine language program thatis crucial in assisting the operating system as it loads.
If you suspect that Windows XP won't boot because thepartition boot sector has been corrupted, you can use a special RecoveryConsole tool called Fixboot to fix it. Start by booting the system with theWindows XP CD and accessing the Recovery Console as described in #4.

To use the Fixboot tool, from the Recovery Console commandprompt, type

Fixboot [drive]:

Where [drive] is the letter of the drive towhich you want to write a new partition boot sector.

Issue: Fix a corrupt master boot record
The master boot record occupies the first sector on the harddisk and is responsible for initiating the Windows boot procedure. The masterboot record contains the partition table for the disk as well as a smallprogram called the master boot code,which is responsible for locating the active, or bootable, partition, in thepartition table. Once this occurs, the partition boot sector takes over andbegins loading Windows. If the master boot record is corrupt, the partitionboot sector can't do its job and Windows won't boot.

If you suspect Windows XP won't boot because the master bootrecord has been corrupted, you can use the Recovery Console tool Fixmbr to fixit. First, boot the system with the Windows XP CD and access the RecoveryConsole as described in #4.

To use the Fixmbr tool, from the Recovery Console commandprompt, type
Fixmbr [device_name]

Where [device_name] is the devicepathname of the drive to which you want to write a new master boot record. Forexample, the device pathname format for a standard bootable drive Cconfiguration would look like this:

\Device\HardDisk0


Resource:


Thursday, April 12, 2012

Fix: Win7 keep on go into StartupRepair / boot manager failed to find os loader


Solution:


To run the Bootrec.exe tool, you must start Windows RE (Window Recovery Console). To do this, follow these steps:
  1. Put the Windows Vista or Windows 7 installation disc in the disc drive, and then start the computer.
  2. Press a key when you are prompted.
  3. Select a language, a time, a currency, a keyboard or an input method, and then clickNext.
  4. Click Repair your computer.
  5. Click the operating system that you want to repair, and then click Next.
  6. In the System Recovery Options dialog box, click Command Prompt.
  7. Type Bootrec.exe, and then press ENTER.

Bootrec.exe options
The Bootrec.exe tool supports the following options. Use the option that is appropriate for your situation.
Note: If rebuilding the BCD does not resolve the startup issue, you can export and delete the BCD, and then run this option again. By doing this, you make sure that the BCD is completely rebuilt. To do this, type the following commands at the Windows RE command prompt:
  • bcdedit /export C:\BCD_Backup
  • c:
  • cd boot
  • attrib bcd -s -h -r
  • ren c:\boot\bcd bcd.old
  • bootrec /RebuildBcd
/FixMbr
The /FixMbr option writes a Windows 7 or Windows Vista-compatible MBR to the system partition. This option does not overwrite the existing partition table. Use this option when you must resolve MBR corruption issues, or when you have to remove non-standard code from the MBR.

/FixBoot
The /FixBoot option writes a new boot sector to the system partition by using a boot sector that is compatible with Windows Vista or Windows 7. Use this option if one of the following conditions is true:
  • The boot sector has been replaced with a non-standard Windows Vista or Windows 7 boot sector.
  • The boot sector is damaged.
  • An earlier Windows operating system has been installed after Windows Vista or Windows 7 was installed. In this scenario, the computer starts by using Windows NT Loader (NTLDR) instead of Windows Boot Manager (Bootmgr.exe).
/ScanOS
The /ScanOs option scans all disks for installations that are compatible with Windows Vista or Windows 7. Additionally, this option displays the entries that are currently not in the BCD store. Use this option when there are Windows Vista or Windows 7 installations that the Boot Manager menu does not list.

/RebuildBcd
The /RebuildBcd option scans all disks for installations that are compatible with Windows Vista or Windows 7. Additionally, this option lets you select the installations that you want to add to the BCD store. Use this option when you must completely rebuild the BCD.

Resources:


Wednesday, April 11, 2012

How to remove Personal Shield Pro in your computer


Personal Shield Pro is a fake security tool which you should remove immediately because its unable to detect, and, of course, remove threats from the system. The purpose of this rogue is to scare you by using misleading methods such false scan results and and then convince you to purchase full version of the software.


When Personal Shield Pro is running, it blocks certain application on your computer, usually Task Manager, Registry editor, other system utilities and of course legitimate anti-malware software.

Solution 1:
1. Reboot your computer in Safe mode with networking.
2. Download free anti-malware software from the list below and run a full system scan.

NOTE: in some cases the rogue program may block anti-malware software. Before saving the selected program onto your computer, you may have to rename the installer to iexplore.exe or winlogon.exe With all of these tools, if running Windows 7 or Vista they MUST be run as administrator. Launch the program and follow the prompts. Don't forget to update the installed program before scanning.

Solution 2:
Make sure that you can see hidden and operating system protected files in Windows.

NOTE: Under the Hidden files and folders section, click Show hidden files and folders, and remove the checkmarks from the checkboxes labeled:
  • Hide extensions for know file types
  • Hide protected operating system files
Click OK to save the changes.

1. Find Personal Shield Pro file(s).

WinXP - C:\Documents and Settings\All Users\Application Data\
Win Vista/7 - C:\ProgramData\

2. Look for suspect ".exe" or ".pspro" files in the given directories depending on the Windows version you have.
NOTE: Basically, there will be a malicious ".pspro" file named with a series of numbers or letters.

3. Rename the file extension:
Example: Rename aYHmMJuqrr2.pspro to aYHmMJuqrr2.vir

4. Restart your computer. The malware should be inactive after the restart.

5. Open Internet Explorer. Download exe_fix.reg and run it. Click "Yes" to safe the changes.

6. Download free anti-malware software from the list below and run a full system scan.
Solution 3:
Personal Shield Pro associated files and registry values:
Just REMOVE and DELETE it.

Windows XP:
C:\Documents and Settings\All Users\Application Data\[SET OF RANDOM CHARACTERS].exe

C:\Documents and Settings\All Users\Application Data\[SET OF RANDOM CHARACTERS].pspro
%Temp%\[SET OF RANDOM CHARACTERS]
%Documents and Settings%\All Users\Desktop\Personal Shield Pro.lnk


Windows Vista/7:
C:\ProgramData\[SET OF RANDOM CHARACTERS].exe

C:\ProgramData\[SET OF RANDOM CHARACTERS].pspro

Registry values:
HKEY_CURRENT_USER\Software\Microsoft\Windows\CurrentVersion\Run "[SET OF RANDOM CHARACTERS].exe"
HKEY_CURRENT_USER\Software\Microsoft\Windows\CurrentVersion\Run "[SET OF RANDOM CHARACTERS].pspro"
HKEY_LOCAL_MACHINE\SOFTWARE\Microsoft\Windows\CurrentVersion\Run "[SET OF RANDOM CHARACTERS].exe"
HKEY_CURRENT_USER\Software\[SET OF RANDOM CHARACTERS]
HKEY_CLASSES_ROOT\.pspro

HKEY_CLASSES_ROOT\PSP
HKEY_CLASSES_ROOT\.exe "Default" = 'PSP'


Resouces:


Monday, April 9, 2012

How to create an uneditable textfield in HTML

Normally we create a simple textfield by following code

Code:


But usually these few line coding are able to let other edit content inside the textfield.

Example:


So what we gonna do is make a small changes in the code and make it become uneditable.

Code:


add in "readonly" in HTML, and make it uneditable by others.

=)

Let's try it~


Sunday, April 8, 2012

How to merge multiple mp3 files into single file

To combine multiple mp3 files into single file, that is easy by using command prompt.

Scenario:
Let's say you have 3 mp3 files want to combine into single mp3 file,

1) Open command prompt console
2) go into the directory where those files is.
3) Enter the command code as below

Code:


NOTE: the command prompt console must be in directory that where the mp3 is. Otherwise you need to put it before the filename.

4) Follow the command code, then you will get a "new.mp3" file in your C:\ drive.

** copy /b is copy the files in binary format
Related Posts Plugin for WordPress, Blogger...